Windows Provisioning made Easy!

Windows Provisioning made Easy!

Requirements:

  • Installation Media for windows server (can be downloaded from my.visualstudio.com if you have the right subscription)
  • A utility computer to prepare the WIM files
  • At least 30 GB of available diskspace, more depending on additional update packages etc.
  • A webserver that you have control over (and legally: isn’t exposed to the rest of the internet as you may not distribute images on the open internet!)
  • Foreman adjusted to support iPXE booting

NOTE: if you only have an actual installation DVD, convert it to an ISO before continuing

Preparing the “Installation Media”

A lot of effort has been invested in the creation of an easy to use script for installation media generation. Although (currently) limited in customizability, it is a solid foundation to continue from. The key-requirement was and will always be: easy to use!

Withouth further ado, let’s get started!

Open a command line interface, navigate to wherever you store your GIT projects (for me that’s C:\GIT) and execute the following command:

git clone GitHub - UXabre/WIMan: WIMan is a Windows Image Generator for The Foreman. It creates both the WinPE file as well as the Windows images with a zero-hassle approach

Navigate to the root folder of this project and observe the folder structure. The most important files & folders are:

  • Sources : This is where the ISO eventually will wind up in
  • WinPE : This is the place where the WinPE adjustments can be made, or original WinPE boot.wims can be stored
  • GenerateWIM.ps1 : this is, ofcourse, where the magic happens!

Let’s begin by creating a folder amd64 under the Sources directory; if you checked out from GIT, this should be already there! This is an arbitrary foldername to indicate the system architecture used. Based on your own preference, you might as well fill in x64; as long as it matches the architecture naming used in foreman (later in this tutorial). Anyway, In this amd64 folder, create a new folder named 2016 (or 2019, depending on your source material). Again, this foldername is arbitrarily chosen and is only really of importance to you and how it matches your foreman configuration.

Inside this newly created folder you should store your ISO-file, containing the original installation media. No worries regarding the filename, as long as it has an ISO extension, you’re good to go!

Optionally you can create 2 additional folders:

  • Drivers : here you can place all additional drivers (in the form of INF files etc. no installation packages)
  • Updates : here you can place either CAB files or MSU files

And that’s it! That’s really it for preparation steps.

Open a new powershell CLI with administrative rights, navigate to the root folder of the WIMan project and execute the following command:

.\GenerateWIM.ps1

As soon as you run this script, it will tell you:

No dedicated winpe.wim file found, we can fetch this automatically for you but this takes a few minutes.

Do you want to continue? (Y/N):

This is probably the only real choice you need to make; do I use the embedded WinPE shipped with my installation media (might be bigger then the clean WinPE, but it saves installation time as WAIK does not need to be downloaded and installed.

Depending on your choice it will install WAIK or immediately continue with the following steps:

  • Copying relevant files from the installation media
  • Detecting windows version on media
  • Removing all possible packages on the WinPE image. (for embedded WinPE images, chances are this will result in a lot of failures, this is normal as these images are already optimized and thus cannot uninstall packages beyond that point)
  • Adding drivers for WinPE to work correctly, for instance disk controllers should be included here; otherwise WinPE won’t find any disk drives and thus won’t be able to install!
  • Optimizing WinPE
  • Then similar steps for each windows image!
    image
    Depending on the additional driver and update packages, the creation can take a few minutes or even an hour on slower systems.

After the script is done, you’ll see a newly created folder in the root directory, called Finalized this folder contains another folder, named amd64 (or any arbitrary name you might have choosen for the architecture) , last but not least, this folder will contain a folder called 2016 (or whatever you named it in the sources directory).

You’ll notice this folder is populated with a few files and folder. You don’t really need to worry too much about this structure.

Copy the entire content from within finalized to your webserver and that’s it!

Preparing Foreman

The last parts are no black magic and involve the same steps as you would for any other OS you add in foreman.

  • Create Operating System, let’s call it “WindowsServer2016”
    • As description set: “Windows Server 2016”
    • Major version should be 2016
    • Family should be windows
    • For root password hash, be sure to select: “Base64-Windows”
    • Select the “Partition Table”: Windows default partition table
    • Add a parameter “wimImageName” and fill in: “Windows Server 2016 SERVERSTANDARD”. These values are not invented or arbitrare, these can actually be seen when executing the script. So, choose the correct value if you wanted anything else
    • Click submit
  • Go to “Host > Provisioning Tables”
    • Look for “Windows”
    • For each of the following templates, edit the association in the association tab and add “Windows Server 2016” as your applicable operating system and click submit:
      • PXELinux chain iPXE
      • Windows default finish
      • Windows default provision
      • Windows default PXELinux
      • Windows default iPXE
      • Windows peSetup.cmd
  • Go to “Host > Installation Media”
    • Click “Create Medium”
    • Name it “Windows Images”
    • As path select “https:///$arch/$major/
    • As “Operating System Family” select Windows
  • Go back to “Host > Operating Systems”
    • Edit “Windows Server 2016”
    • For Installation Media select “Windows Images”
    • For Templates, select the correct template for each part (there will probably be only one template to choose from, so should be okay)

Finally

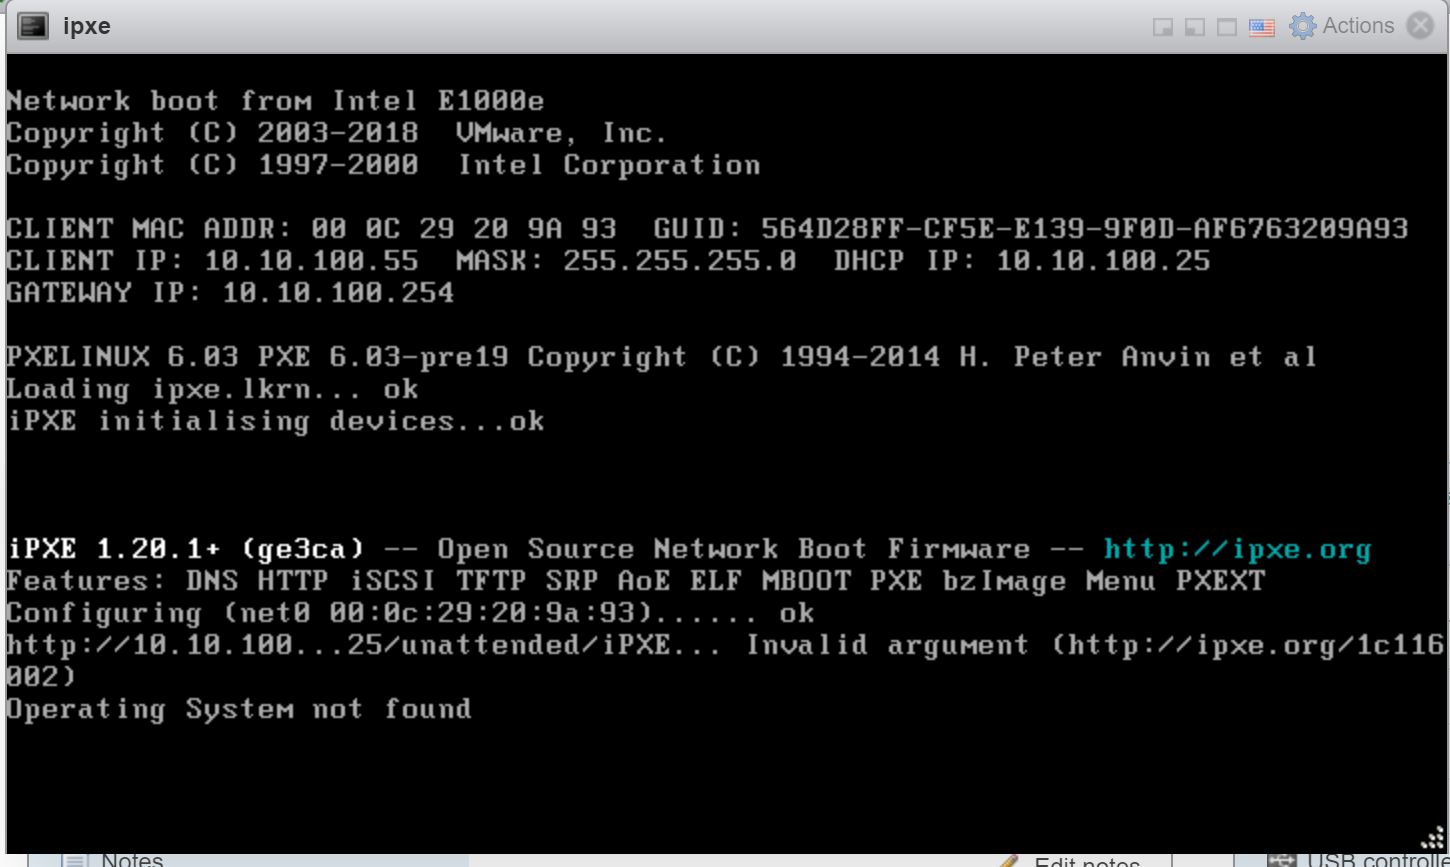
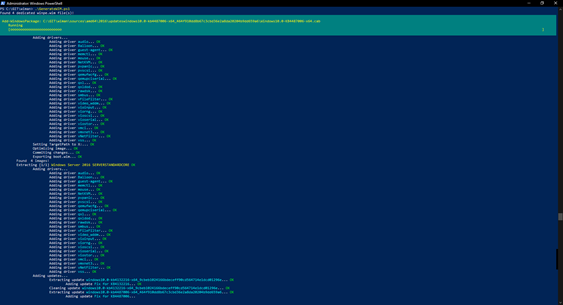
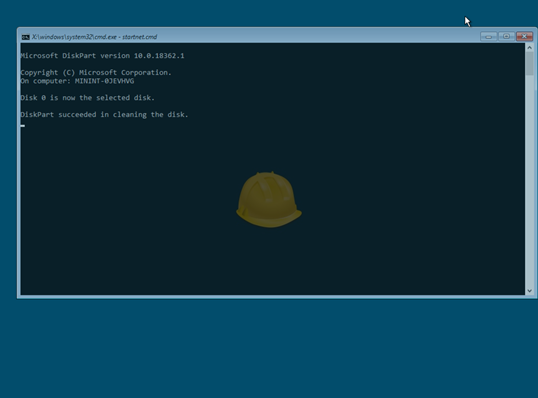
Create a new VM and select windows as the operating system and start your provisioning engines! In the first steps you’ll see WinPE popping up:
image
If you see this, chances are that you’ll have smooth sailing ahead of you. Otherwise: check if your webserver was accessible (by observing the Smart-Proxy logs) and also verify that ipxe.krn is available in your /var/lib/tftboot/ folder

17 Likes

I did forget to mention, you’ll need the latest community templates including the PR Adapt script to work with WIMan by UXabre · Pull Request #674 · theforeman/community-templates · GitHub before this will work correctly! If I’m not mistaken, these will be in Foreman 1.25 out-of-the-box :slight_smile:

Good news! The latest community templates contain this patch so, using the latest greatest community templates should get you up and running!

Also for the people who hearted this: big thanks and can you also confirm that you got it up and running using this guide? (might be helpful for people who are still on the fence)

1 Like

Hi everyone,

Just wanted to let everyone know that I’ve released a new and improved version of WIMan.

Changelog

[0.0.2] - 2020-02-04

Added

  • Supports detecting already installed WAIK and wopies the WinPE images from there. (otherwise fallback to installing WAIK via choco)

BugFixes

  • Fixed issue for which installed WinPE images where not detected
  • Changed error supression pattern
1 Like

Hello,
Supermany thanks for your work.
I would like to ask, just to be sure, the client.wim image - is there a way to make-it smaller? Or should be splited?
Thank you

Hi @ccociug,

I’m not sure I entirely understand the question. The WinPE has been made as small as possible, so far my attempts to make it smaller have failed. For x64 this is around 250 MB. For x86 around 200 MB.

As for the windows images, if my algorithm detects similarities in the images it splits them up in these fractions. The simplest variant is Core and Desktop Experience images, these are split up accordingly. Meaning, if I have multiple core editions I will bundle these and strip out the desktop experience and vice verso, resulting in 2 image files (not taking into account the winpe image). Beyond that point, I didn’t do any further optimizations to make it much smaller (i throw away uninstallers for updates though… But that’s as far as it goes)

I hope this clarifies things a bit :slight_smile:

Kind regards,
Arend

Great stuff @UXabre,

Is it possible to have it link to a custom wim file that has been built already via wds/mdt? So all I need is to discover and choose Windows xxxx. Then during the build it uses the custom wim that has all the app packages(Word, Excel…) and settings/configs included?

Hi @dil,

This use-case you describe is very much supported. What you need to do is create a folder called “sources” to your OS root on your web-server (e.g. /amd64/2016/); after which you copy your wim file to this folder (e.g. /amd64/2016/sources). You should also rename this to install.wim if you want to utilize the legacy mode. If you multiple wim files or you cannot change the filename (or it’s more convenient to not change it), you utilize a map file. This map file is stored in the same sources folder, next to your WIM file.

The is map file is called “images.ini” and has the following example layout:

Windows Server 2016 SERVERSTANDARDCORE=Server Core.wim
Windows Server 2016 SERVERSTANDARD=Server.wim
Windows Server 2016 SERVERDATACENTERCORE=Server Core.wim
Windows Server 2016 SERVERDATACENTER=Server.wim

Before the equality sign is the value of your “wimImageName” parameter. If a file contains multiple images, you simple point it to the WIM file that contains this image :slight_smile:

NOTE: the images.ini method only works if you have the latest community templates (I don’t think it’s in the latest version of Foreman at least)

I hope this helps your use-case!

Kind regards,
Arend Lapere

1 Like

Hello,
My fault, I was no so clear, as Windows is not my friend at all.
I cannot find an boot.wim in the finalized folder after running the generatewim script. So I tried to replace it with client.wim from the new compilation folder - but that is to big.
Then I copied it from your winpe folder/images/amd64 but with this one the winows installation fail because cannot find the media driver to install.

Hi @ccociug,

So sorry to hear you’re having trouble getting this to work.

  1. Just to be sure; are you using the latest greatest code from github? There were some issues with the previous release (from about a week ago) that made it a bit difficult to use.
  2. boot.wim should be located inside "\finalized\amd64<windows folder>\sources"
  3. Any other boot.wim will probably not work because it might be missing drivers and surely it misses a call to the peSetup.cmd script (the script that foreman provides)

If you’ve tried all this, could you tell me if you see any errors during the generation? Perhaps it’s easiest if you paste your output here; then I can help you further :slight_smile:

Kind regards,
Arend

The output is like below, no error but boot.wim is missising. I will download the last version of the code, right now.
PS C:\git\WIMan> .\GenerateWIM.ps1
Found 4 dedicated winpe.wim file(s)!
Building media for 2020 [ amd64 ]
Extracting ISO for source [ 2020 ]… Copy complete
Detected Windows 10
Extracting boot.wim OK
Configuring WinPE Console… OK
Adding drivers… Skipping
Setting TargetPath to X:… OK
Optimizing image… OK
Commiting changes… OK
Exporting boot.wim… OK
Found 11 images!
Deleting older … OK
Extracting [1/11] Windows 10 Home OK
Adding drivers… Skipping
Adding updates… Skipping
Optimizing image… OK
Commiting changes… OK
Exporting ‘Windows 10 Home’…OK
Writing entry to images.ini… OK

Thank you UXabre and great work. This is much easier than the previous method which took me days to get a working wim. This method only took a few minutes to setup and worked the first time. I do have a question though and I ran into one issue.

My question is once ran in the finalized folder I end up with a server.wim and a servercore.wim file. When I setup the OS in Foreman I added the parameter for the image name. But when Foreman creates the folder for the host in /tftpboot/boot/ It copies over all the files except the wims and I end up with a blank boot.wim in that folder. Is that normal or should it be copying the wims to that folder too.

The issue I’m having is when I try to load via ipxe. When it try’s to grab the unattended file it gets an invalid argument and errors out. I’m attaching a screenshot of the error.

Any clue on how to resolve this error? I have been searching for days, using syslinux 6.03 and the latest version of ipxe.

Hi @ksuber,

Great to hear you’re having good results with this new method! As for the WIMs; there are in fact 3 WIMs in your case; the last one should be “boot.wim” (which is the WinPE file). This file should be in the “sources” folder as well.

As for your iPXE error, I do see a bit of a strange IP address , “10.10.100…25” could it be that something went wrong during configuration? I would almost say/assume that the TFTP server isn’t correctly configured during installation (in the foreman interactive installer, you should be able to pass a fixed TFTP server address; it’s under the smart-proxy settings).

Do other unattended installations work? E.G. are you able to install a Linux based system?

Kind regards,
Arend

UXabre,

Ok so in my finalized folder I only have two wims ServerCore.wim and Server.wim and no boot.wim at all.

The url you were correct about. I have no idea how the extra dots got in there, I thought it was something weird Foreman was doing. This is a new build but I was deploying Centos without issues so I didn’t even think it could be the url, not sure how it got changed.

So I think my only issue is I’m not getting a boot.wim in my finalized folder just the other two files.

Hi @ksuber,

Would it be possible to share the entire output of the script (unfortunately I didn’t find the time yet to have a debug log, so manually copy-pasting from the console is the only way)?

Also, just to be sure, you’ve used the latest codebase?
Finally, if you could also share the windows version you were using to build these images (if all goes well, I can recreate your situation and fix it)

Thank you for this information and sorry for the inconvenience this might cause you

Kind regards,
Arend

I am facing this problem on win server 2012:
.\GenerateWIM.ps : The term ‘.\GenerateWIM.ps’ is not recognized as the name of a cmdlet, function, script file, or
operable program. Check the spelling of the name, or if a path was included, verify that the path is correct and try
again.
At line:1 char:1

  • .\GenerateWIM.ps
  •   + CategoryInfo          : ObjectNotFound: (.\GenerateWIM.ps:String) [], CommandNotFoundException
      + FullyQualifiedErrorId : CommandNotFoundException

Thanks this is really useful!
I had some problems with the powershell install script because the WAIK was already installed and firwall, but i got it solved.

My problem now is: What boot method do i have to choose in Foreman? I used iPXE Chain UEFI but it always gets stuck at “iPXE initialsing devices… OK” and then repeats the process. Any hint where i can look for logfiles?

Hi @ashish,
Welcome on the Foreman community pages!

From looking at your error, it seems that the script has been misspelled. The extension of a powershell script is “ps1” in your case I noticed it to be “ps” (so ‘1’ is missing).

Could you retry running .\GenerateWIM.ps1 ?
Let me know if you have any issues running this!

Have fun & Kind regards!

Hi @Elektromane,

Glad to hear you’re finding this script useful! Regarding your previous errors, could you explain what you did to resolve the issue? Since the latest codebase I should be able to detect and utilize WAIK. Also, what was the issue with the firewall?

As for boot methods; currently I’ve only verified this using iPXE chainloaded over PXE. If these errors happen in your boot process (so on a machine), I think you’ll have to enable some form of debugger (so you can at least ready any error message that occur). That part, at least, runs outside of foreman’s control.

Anyway, it’s also on my todo list to investigate how to properly configure Windows installation over UEFI but I didn’t manage to do this yet. As soon as I’ve done it, I’ll let you know, but at this point I think you’re definitely in the lead; if you’d be so kind to share any solution you managed to come up with with regards to UEFI booting a windows installation, that would be great!

Thanks & Kind regards!

Thanks for your Answer.

I’ll make a github issue, but it was not very tragic.
For the Machine, I run a VM in vcenter (EFI, V15 and VMXNET 3) and used iPXE Chain UEFI
or which option should i use in this case? Sorry I’m really new to this whole thing and there are several options.Or just name the settings which worked for you. I just want to get it running one time :slight_smile: