Hello,
when you want to test Anaconda kickstart process in a libvirt VM, there is actually no need to do full provisioning setup. Here is a tutorial how to quickly provision a VM using just the default installation. I tested this on Satellite 6.10 (beta), therefore, this is guaranteed to work with Katello 4.1. Any Foreman or Katello version should work tho, this is nothing new. Let me refer my installation as simply “Katello”, you can also use Foreman but there will be slight differences I will point out.
This guide is meant for non-production use, we do not generally recommend to use libvirt directly (use RHV, oVirt, VMWare or bare metal) and also we believe that booting from the network is the most flexible way to do provisioning. You might find this useful for testing or development purposes as many users or developers find kickstart provisioning setup to be complex.
Also keep in mind that this process will only work with kickstart as Anaconda installer is the only installer to my knowledge that has a required feature of sending host MAC address in HTTP headers.
Step 1: Install Katello
All you need to do is to follow our official installation guide. In short, you would do something like:
foreman-installer --scenario katello
As you can see, there are not PXE, DHCP, DNS or other provisioning options needed.
Step 2: Create a domain
In order to create a host, a domain must be created. This is as easy as going to Infrastructure - Domain and creating a new one. Let’s use example.com in this tutorial. Typically, you will see a domain of the host itself as puppet will upload facts and create unmanaged host, you can use that domain too.
There is no need to setup a DNS proxy or associate the domain with any DNS foreman proxy at all. We only need a domain in order to create a valid host entry as it is the only required field.
Step 3: Synchronize content (optional)
When using Katello or Satellite, create a product, a repository and synchronize a content. I have tested this with CentOS 8 Stream but any kickstart-compatible OS will work. Katello synchronization process will also create architecture, operating system and associate all templates which is a handy feature.
When using Foreman without Katello, you need to create operating system, architecture and associate Kickstart template (“Kickstart Default”) with the newly created OS as well as partition table and installation media of the OS you want to use.
Step 4: Create a host
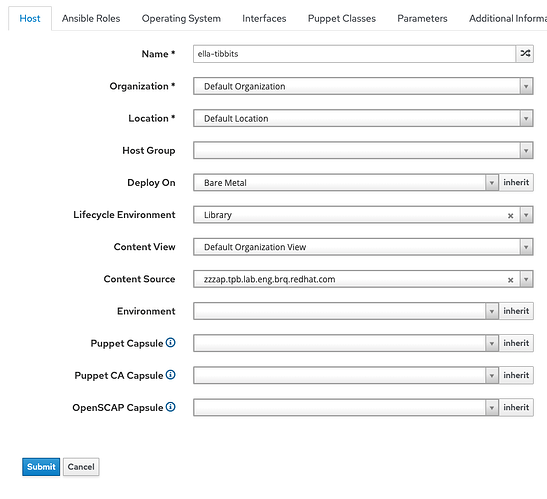
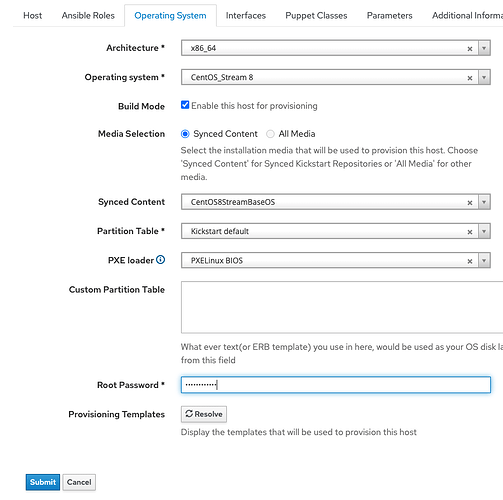
Create a new host, give it a name, pick lifecycle environment, content view and source, architecture, operating system, synced content, partition table, PXE loader (you can set None it does not matter) and a root password. If you synced a Katello kickstart repository, all fields will have at least one value so there is no room to make any error. When creating all resources manually with Foreman, make sure to fill everything correctly.
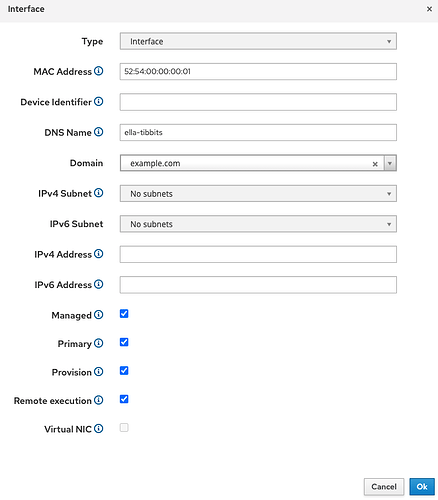
On the network interfaces, it is important to click on Edit and fill in a MAC address: 52:54:00:00:00:01. Feel free to use any random MAC address as long as it starts with 52:54:00 prefix - that is required by libvirt. Select the domain you created in the second step and click on Ok, then Submit.
Step 5: Create a VM
On any libvirt that can reach the Katello instance over nework, create a new VM with virt-install tool:
virt-install -n myhost --vcpus 2 --memory 3100 --os-variant rhel8-unknown --graphics none --noautoconsole --serial pty --disk path=/var/lib/libvirt/images/myhost.qcow2,format=qcow2,size=8 --network default,mac=52:54:00:00:00:01 --location http://xxx.redhat.com/pulp/content/Default_Organization/Library/custom/CentOS8/CentOS8StreamBaseOS/ -x "console=ttyS0 inst.ks.sendmac inst.ks=http://xxx.redhat.com/unattended/provision"
Hit enter, libvirt will download initramdisk and Linux kernel from the kickstart tree over HTTP, spawn a new VM, Anaconda will boot up and requests kickstart for this host installing it completely. Magic!
Let me break up the command argument by argument now:
virt-install -n myhost --vcpus 2 --memory 3100
This is pretty much crystal clear, in my example I use 2 virtual CPUs and 3 GB of RAM. For network-based installation it is recommended to never go lower than 3 GB.
--os-variant rhel8-unknown
Typically, virt-install detects most Linux distributions automatically, but new RHEL8 clones (RockyLinux, AlmaLinux) are new and might not be detected yet. For best VM performance, it is useful to tell the hypervisor which drivers to emulate.
--graphics none --noautoconsole --serial pty
Use these arguments if you prefer more user-friendly serial console over VNC/Spice. If your hypervisor has a graphical desktop environment, you can remove these three arguments completely (make sure also to drop console=ttyS0) and virt-install will automatically start a virt-viewer connected to the graphical console. I simply prefer to use serial console, in that case you can watch the progress of the installation via virsh console myhost.
--disk path=/var/lib/libvirt/images/myhost.qcow2,format=qcow2,size=8
Disk configuration, I actually made this up, I use LVM myself for all my VMs, but this should work out of box if you use the root libvirt session. For user session, you would use a different path.
--network default,mac=52:54:00:00:00:01
Very important network configuration, it is using the default NAT virtual network called default which is preconfigured with libvirt on Fedora and most other distros too. Use the same MAC address you entered in step 4!
--location http://xxx.redhat.com/pulp/content/Default_Organization/Library/custom/CentOS8/CentOS8StreamBaseOS/
Location libvirt downloads kernel and init RAM disk (Anaconda) from, when using Katello (Satellite) use the kickstart tree URL (Product - Repository - Published URL). When using Foreman without Katello, use any location with a kickstart tree (installation media URL).
-x "console=ttyS0 inst.ks.sendmac inst.ks=http://xxx.redhat.com/unattended/provision"
And finally, required parameters for Anaconda. Use console=ttyS0 only if you want to use serial console instead of graphical one. Make sure to keep inst.ks.sendmac because that is required for Foreman to match the host from the inventory. And finally, inst.ks is the URL of Katello itself which will serve the kickstart template.
There you have it, kickstart provisioning in five simple steps. This post is a wiki, feel free to update it. Cheers!


